Day 38: How to Host a website (route 53) & Routing technologies
#90daysofdevops


🔸How to launch/host a website live through Route 53
By domain from website like godaddy, google domain, hostinger or you can also buy domain in route53.
In route 53 create hosted zone
Launch instance and install nginx in that instance & copy paste your index.html file in /var/www/html/index.html
Now go in hosted zone, click on your domain (ex- xyz.com) & create record
Select Simple Routing
Select Define simple record -> Then create record
Type your domain name on google & your website will be live & run
Remember, we've only hosted the website for now. We'll handle SSL in the next blog
We've uploaded the website on EC2, and EC2 IPs are never static; if we accidentally terminate EC2, our website could also go down. So, for that case, we'll follow the steps provided below.

Create VPC
Create 2 public subnet
Create 1 Private subnet
Create internet gateway & attach to VPC
Create 2 route table
- 1st route table: click on 1st route table -> actions -> edit subnet association > select both public subnet -> save association -> after that edit route in 1st route table -> 0.0.0.0/0 -> select igw in target -> save changes.
Launch instance -> select VPC that you have created -> Select public subnet under network setting -> Add security group to http (anywhere) ->
Write this script in user data under advanced details
 #!/bin/bash
 yes | sudo apt update
 yes | sudo apt install nginx
 echo "<h1>Server details</h1>
 <p><strong>Hostname:</strong> $(hostname)</p>
 <p><strong>IP Address: </strong>$(hostname -I | cut -d" " -f1)</p>" > /var/www/html/index.html
 sudo systemctl restart nginx
Create target group -> Select instance -> Select target group -> include as pending below
Create Load Balancer -> Create security group -> edit inbound rule -> add ssh and http in that -> Create Load balancer
🔸Simple Routing
Simple Routing: Manually configured fixed routes on network routers, less adaptive than dynamic routing protocols.

- Create route 53 -> Go to hosted zone -> click on xyz.com (your domain) -> Create record -> select simple routing -> choose Alias to application & classic load balancer under endpoint -> choose region -> choose load balancer (Remember, you've created only one load balancer then select that one only) -> define simple record -> xyz.com (your domain) & click on create record
🔸Weighted Routing
Weighted Routing: Distributes traffic across multiple paths using predefined weight values to optimize performance and balance loads.

Note: untill point number 8, you need to follow the same process, then afterwards, do what's mentioned below
Create 2nd VPC
Launch 2nd instance -> select public subnet -> do auto assign enable -> Add Security group to http
write this script in user data under advanced details
#!/bin/bash
yes | sudo apt update
yes | sudo apt install nginx
echo "<h1>Server details</h1>
<p><strong>Hostname:</strong> $(hostname)</p>
<p><strong>IP Address: </strong>$(hostname -I | cut -d" " -f1)</p>" > /var/www/html/index.html
sudo systemctl restart nginx
Create target group
Create load balancer -> select both public subnet
Route 53 -> hosted zone -> xyz.com (your domain) -> create record -> select weighted routing -> define weighted record -> choose endpoint (Alias to application & classic load balancer) -> choose region & choose load balancer -> select weight (remember select number between 0-255 because it's 256 bits) => Define weighted route
Add one more define weighted route (same as above) Remember: Choose another load balancer
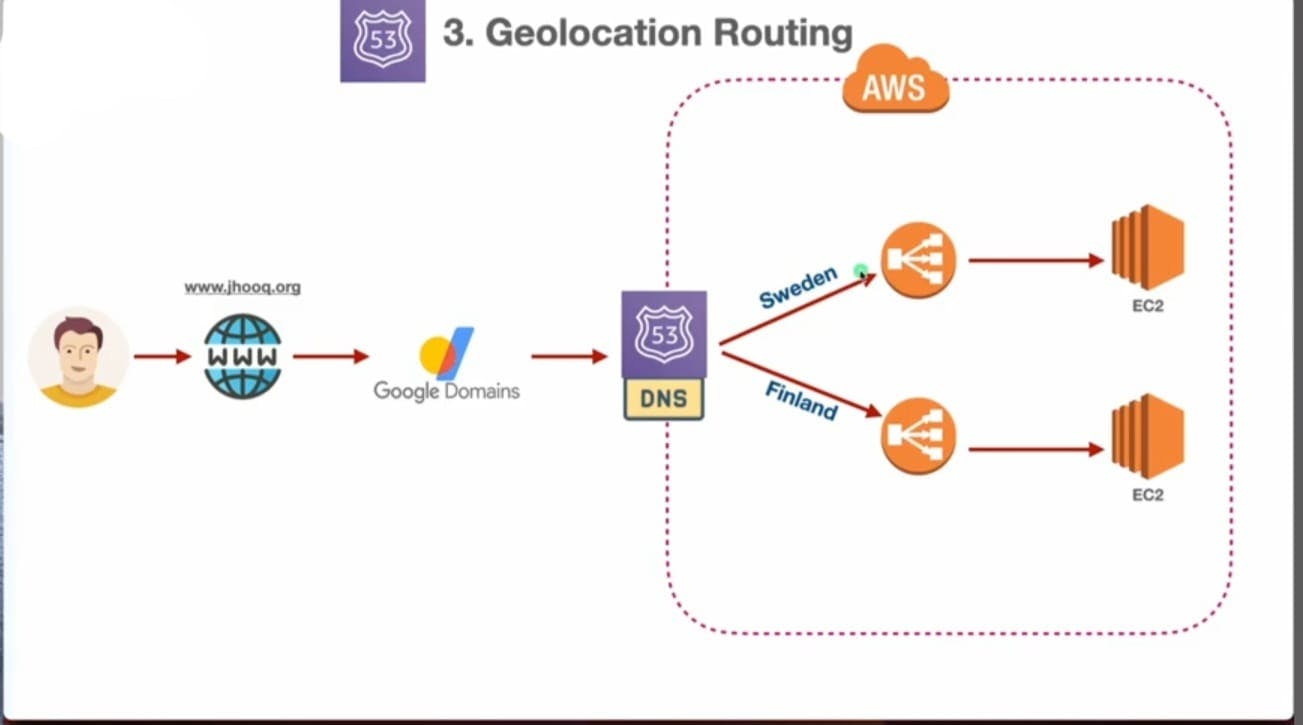
🔸Geolocation routing
Geolocation Routing: Directs traffic based on user or server location to optimize performance and reduce latency.
Note: untill point number 8, you need to follow the same process, then afterwards, do what's mentioned below
Create record -> Select geolocation -> define geolocation record -> choose endpoint (Alias to application & classic load balancer) -> choose region & load balancer -> choose location (ex- sweden) => define record
Add one more define geolocation route (same as above) Remember: Choose another load balancer
Select both record & click create record
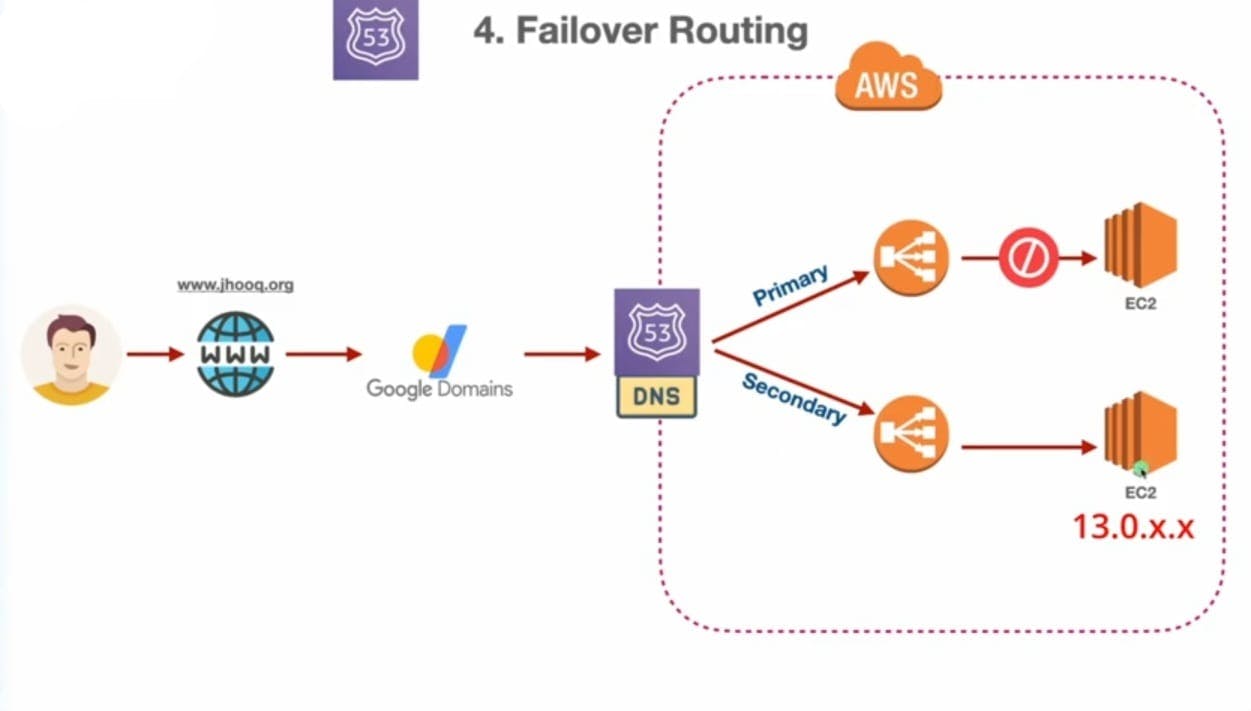
🔸Failover routing
Failover Routing: Automatically redirects traffic from a failed or congested network path to an alternate path for high availability and reliability.
Note: untill point number 8, you need to follow the same process, then afterwards, do what's mentioned below
Create record -> Select Failover -> define failover record -> choose endpoint (Alias to application & classic load balancer) -> choose region & load balancer -> choose type primary => Define record
Add one more define failover route (same as above) Remember: Choose another load balancer -> choose type secondary => Define record
Conclusion
In this blog, we've observed how website hosting is done using different routing technologies. In the next blog, we'll explore how to attach an SSL certificate.
Thanks for reading to the end; I hope you gained some knowledge.❤️🙌